What is NodeMCU
NodeMCU is a Microcontroller development board. It is Low cost version and is open source you could get the schematics, driver flies, source code on the internet for free. Both Firmware and Hardware is based on ESP8266. In Wi-Fi module of ESP8266 and ESP32, ESP8266 is a Wi-Fi module.
Why is so Popular
The reason for NodeMCU popularity is:
- Cheap: The module cost starts from 200rs, whereas other microcontroller modules cost more.
- Powerful: NodeMCU comes with 32-bit RISC Processor.
- Low power consumption: It has low power consumption to operate the NodeMCU it requires as low as 3.3v.
- IDE: NodeMCU supports Arduino IDE (Integrated Development Environment) which provides full control over the microcontroller.
NodeMCU Version 1.0
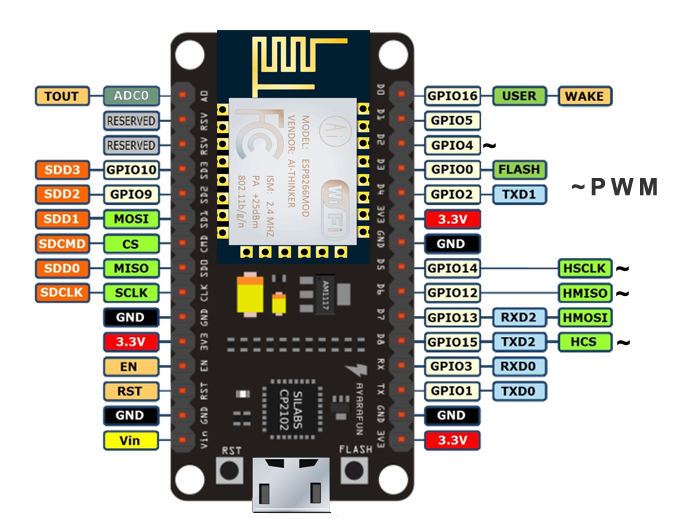
NodeMCU Pin Out:
| PIN Name | Description |
|---|---|
| D0 (GPIO 16) | General Purpose Input/Output pin 16 |
| D1 (GPIO 5) | General Purpose Input/Output pin 5 |
| D2 (GPIO 4) | General Purpose Input/Output pin 4 |
| D3 (GPIO 0) | General Purpose Input/Output pin 0 |
| D4 (GPIO 2) | General Purpose Input/Output pin 2 |
| D5 (GPIO 14) | General Purpose Input/Output pin 14 |
| D6 (GPIO 12) | General Purpose Input/Output pin 12 |
| D7 (GPIO 13) | General Purpose Input/Output pin 13 |
| A0 | Analog input pin |
| TX (D1) | Transmit pin for serial communication |
| RX (D0) | Receive pin for serial communication |
| MOSI | Master Out Slave In pin for SPI communication |
| CS | Chip Select pin for SPI communication |
| MISO | Master In Slave Out pin for SPI communication |
| SCLK | Serial Clock pin for SPI communication |
| SDA (D2, GPIO 4) | Serial Data pin for I2C communication |
| SCL (D1, GPIO 5) | Serial Clock pin for I2C communication |
| 3.3V | Power supply pin (3.3 volts) |
| GND | Ground pin |
| RST | Reset button for resetting the microcontroller |
| Flash | Push-button used for flashing or programming the ESP8266 chip |
| USB | Micro USB connector for powering up the NodeMCU and programming the chip |
ESP8266
The ecosystem of ESP8266 can be divided into three layers.
- Microchip
- Modules
- Boards
At the bottom layer, we have the microchip. Above that, we find the modules, such as ESP-01 or ESP-14. Finally, at the top layer, we have the boards, like the Wemos D1 mini and NodeMCU, among others. we'll explore each of these layers in detail.
Microchip:
At the heart of it all is a tiny, low-cost Wi-Fi chip produced by ESPRESSIF. This microchip utilizes the L-106 32-bit processor and operates on 3.3 volts. It offers 17 GPIO pins, UART, SPI bus for communication, software I2C, PWM, I2S with DMA, and one ADC pin. It's important to note that the Wi-Fi operates solely on the 2.4 gigahertz frequency and not on the newer 5 gigahertz. Therefore, make sure to enable it on your access point.
The ESP8266 chip utilizes external flash and doesn't have built-in storage. It connects to the flash via SPI using 6 IO pins. Some chips come with as little as 1/2 meg to 4 megs or more of flash memory. The GPIO pins of the chip operate at 3.3 volts and are 5-volt tolerant. Keep in mind that the maximum current draw from a single pin is 12mA, so exercise caution when powering external active components. LEDs or communication buses are generally fine, but if you require more current, such as for a relay, you'll need to use a transistor for power.
Modules:
Now, let's talk about the modules. AI-Thinker created the ESP8266 modules, which take the ESP8266 chip and add flash memory. Some modules include an antenna and are FCC certified. The modules range from ESP-01 to ESP-14, with ESP-01 and ESP-12 being the most popular.
To load your code onto these modules, you'll need a USB to serial programmer. Connect the rx pin to tx, tx to rx, power to power, and ground to ground. Just ensure not to use 5 volts, as it could damage the module. Before connecting the device, make sure to put the module in flashing mode by pulling the GPIO0 pin low (connect it to ground).
Some modules come with custom-made programmers that can be plugged in for code loading. For example, the ESP-01 programmer eliminates the need for wiring and potential mishaps, especially for beginners.
Boards:
Moving on, let's discuss the development boards. ESP8266 development boards provide all the necessary components for building prototypes. They come equipped with an onboard USB to serial programmer, a 3.3 voltage regulator, LEDs, buttons, and a voltage divider for the ADC. These boards are also breadboard-friendly, making them ready to program right out of the box.
You can utilize them to create custom smart home devices, such as monitoring house temperature, checking car battery levels, or playing MP3 notifications. Check the description below for project ideas. Some boards, like the Wemos D1 mini, offer easily pluggable components like sensors, LEDs, and monitors.
Conclusion:
If you're a beginner venturing into these projects, my advice is to start with development boards, as they are more beginner-friendly. In addition to the ESP8266, there are two other noteworthy boards: the ESP8285, which is an ESP8266 chip with 1Mb of built-in flash, and the ESP32, the more powerful sibling of the ESP8266 with built-in Bluetooth and additional functions.


0 Comments
If you have any doubts, Please let me know.